In my last post I discussed various build and deployment models and in particular build once and deploy anywhere. Rather than leaving it there I thought I should try to make this more real by drawing on some experience of actually doing this for real.
I was using Teamcity for the build part of the model and Octopus Deploy for deployment. But this isn’t a post about how to use these technologies. Instead I hope to highlight some of the things you need to think about when implementing this model. My intention is that this is applicable to any build and deployment technology but having a concrete example is a useful reference point.
It is important to understand what you want before configuring the technology to work that way. However, you should not forget to consider how the technology wants you to work.
For example, using Octopus Deploy did end up influencing what the end result looked like. Octopus Deploy works through conventions – if you use them then the product does much of the heavy lifting without much help. If you don’t you are likely to have your work cut out. The very fact that you are using conventions that Octopus Deploy expects has impacts that ripple out to your build server and even your project or solution structure.
In this setup the Build server (Teamcity in my case) was responsible for the following
- Getting the code from source control
- Compiling the code
- Running unit tests
- Packaging the solution
- Kicking off an automated release into a Dev/Test environment
The package is the key interface between the build and deployment server. As an interface it is the coupling point – it is the place where the build has to understand what the deployment server is expecting.
Environment configuration is the hot spot for Build Once Deploy anywhere models. Here the build cannot be relied up on to apply environment specific settings.
Once build servers would be configured to compile a build configuration in a visual studio solution. This mapped to a particular environment and the act of compiling the solution would ensure that all necessary configuration transforms were applied. The preconfigured solution was packaged and then dropped without change into an environment. The primary drawback of this was that the solution and the build server needed to know exactly how many environments you had. To some people this might not be an issue but to others this represents an unnecessary overhead.
Coming from a developer background I want all my configuration settings for all environments sitting alongside my code in my source control system. If I came from an infrastructure background maybe, I’d think differently. Maybe I’d be happy having all the configuration settings available to the deployment server in a different way, separate from the source code. However, I’m not, so the primary challenge I have when setting up a build once deploy anywhere release pipeline is how to get all the configuration settings needed from source control to the deployment stage. This is a question of how to package the solution.
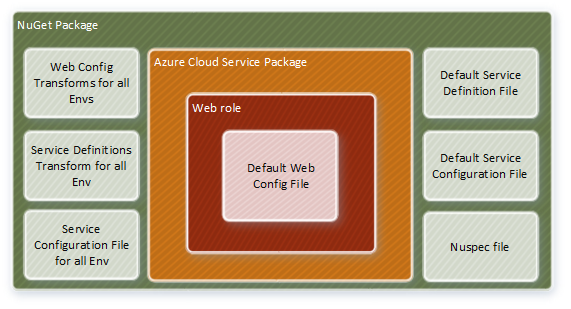
Octopus Deploy wants NuGet packages, so the build process has to create and publish them. Depending on what you are deploying you may be creating a NuGet package of a package – for example if working with Azure Cloud services they need to be packaged first and then placed in a NuGet wrapper. When you look at a cloud service package there are a number of configuration points. Firstly, there is the web and worker roles themselves so there will be at least one app or web.config file lying around. Next comes the service configuration and the service definition files.
When working with a build once deploy anywhere model the first thing to remember is that it doesn’t really matter which configuration you apply to the solution at the build stage. Okay you might need to consider the configuration settings required to run your test suite but these settings are not going deployed or at least used in any target environment. Instead the deployment stage will transform or replace your configuration as necessary for the particular environment it is deploying to. Or in other words the build stage is environment agnostic – it is completely unaware of which environments you have and it is not impacted if you were to add or even remove environments.
To create NuGet packages you need a *.nuspec files. This is an XML based manifest for the package describing all the files necessary to create it. The next thing you need is a tool to interpret the *.nuspec file and to turn it into a package. There are various tools that can do this. I chose OctoPack as I was targeting Octopus Deploy. It seemed the obvious choice. Octopack itself is a Nuget package so using it is as simple as adding it to the projects in your solution that you want to package, through the NuGet package manager, and running a command such as:
msbuild MySolution.sln /t:Build /p:RunOctoPack=true
Now we know how to create a package but how is that going to solve the problem of getting all the necessary configuration to the deployment server? The key is what we put in the *.nuspec file.
In the case of an Azure cloud service web role we need the web.config and environments specific transforms, the service definition file and its transforms and environment specific Service Configuration files. This can be achieved like this.
<file src="..\MyWebRole\bin\$ConfigurationName$\app.publish\*.*"
       target="" />

<file src="web.*.config" target="WebConfigTransforms" />

<file src="..\MyWebRole\ServiceConfiguration.*.cscfg"
        target="ServiceConfiguration" />

<file src="..\MyWebRole\bin\$ConfigurationName$\ServiceDefinition.csdef"
        target="" />
<file src="..\MyWebRole\ServiceDefinitionProfiles\ServiceDefinition.*.config"
        target="ServiceDefinitionTransforms" />
Here I’m doing the following
- Packaging the output of the Cloud Service
- Adding the Web.config transforms into a folder called “webconfigtransforms” in the package
- Adding the environment specific ServiceConfiguration.cscfg files into a folder called “ServiceConfiguration” in the package
- Adding the primary ServiceDefinition file to the root of the package
- Adding transforms for the ServiceDefinition into a folder called “ServiceDefinitionTransforms” in the package
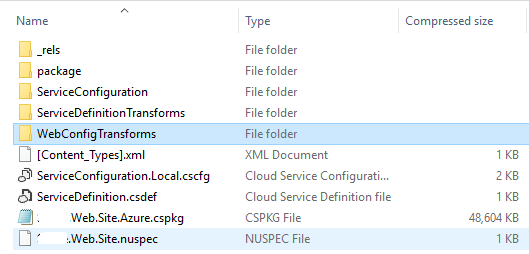
It should be noted that the web.config file is already part of the web role and therefore it is automatically deployed in the Azure cloud package. The first line of the snippet above adds this package. The result is the *.cspkg file in the Nuget package below. This is just a zip file so you can explore its contents in your favourite zip tool.
This represents my first attempt of packaging my solution. In the next post I’ll walkthrough what I needed to do on the deployment side to consume this package and as it turned out, what I needed to change in the packaging step to align with what Octopus Deploy wanted.
